Your OSINT Lab Starts Here: Installing VirtualBox and Building an Investigation VM
If you're doing investigation work without a VM, you're leaving browser fingerprints, cached credentials, and research artifacts scattered across your daily-driver machine. The fix is simple: build and use a VM correctly, keep it updated, and understand what isolation actually means instead of treating it like a magic box.
What follows is a walkthrough for getting VirtualBox installed and an OSINT VM configured from scratch. Not the "download this .ova and you're done" approach, though I'll cover when that shortcut makes sense. The full build, with the network configuration, snapshot workflow, and operational security layers that turn a VM from a checkbox item into something that protects your work.
Why VirtualBox and Not Something Else
The last time I used VMWare I thought it had a more intuitive interface, but I became more familiar with using Virtualbox because of cost. When I started in OSINT, VMWARE pro restricted the snapshots feature behind a paywall. These days, the difference is negligible and use what you like however virtualbox is what I'm comfortable providing a walkthrough for.
One thing to flag early: if you're running Windows with Hyper-V or WSL2 enabled, VirtualBox can conflict with Windows' Virtualization-Based Security. You'll see performance issues or outright failures to start VMs. The workaround is disabling Hyper-V, but that breaks WSL2. If you rely on WSL2 for other work, VMware handles this coexistence better. Worth knowing before you commit to an install.
Installing VirtualBox
Windows
Download the installer from virtualbox.org/wiki/Downloads. You want the "Windows hosts" link. Run the .exe, accept the defaults, and reboot when prompted. The installer will set up the network drivers VirtualBox needs. If Windows Defender flags anything during the network driver install, that's expected. It's creating virtual network adapters.
After the reboot, open VirtualBox Manager. If it launches without errors, you're good. If you see a warning about the vboxdrv kernel driver, rerun the installer. The reboot likely interrupted the driver registration.
macOS
Download the .dmg from the same downloads page. Open it, drag VirtualBox to Applications, and run it. macOS will ask you to approve the Oracle kernel extensions in System Preferences → Security & Privacy. Without that approval, VirtualBox won't be able to create VMs.
If you're on Apple Silicon (M1/M2/M3/M4): VirtualBox 7.1 and later have native ARM support, but your guest operating system also needs to be an ARM build. Standard x86 Ubuntu ISOs won't boot. Grab the ARM64 version of Ubuntu Server or Desktop. Fewer pre-built OSINT VMs support ARM, which means you'll likely be building from scratch. I'll cover that path later in the post.
Linux (Debian/Ubuntu)
If your distribution's repository has an older version, download the .deb package directly from virtualbox.org. You may need to load the kernel module manually:
If modprobe fails, you're likely missing the kernel headers. Install them and rebuild:
$ sudo /sbin/vboxconfig
The Extension Pack Question
VirtualBox has an Extension Pack that adds USB 2.0/3.0 passthrough, disk encryption, NVMe support, and PXE boot. It's free for personal and educational use but requires a paid license for commercial deployment. If you're doing OSINT work for an employer, check whether your use falls under PUEL terms.
For this walkthrough, you don't need the Extension Pack. The base install handles everything required for an OSINT VM. If you want USB device passthrough (connecting a phone to the VM for mobile forensics, for example), that's when the Extension Pack matters.
I put together the OSINT VM Setup CheatSheet as a quick reference so you do not have to re-read this article every time you rebuild a VM. Download it below.
Creating Your VM: The Settings That Matter
Open VirtualBox Manager and click "New." Here's what to set:
Name and OS: Name it something recognizable. "OSINT-Primary" works. Type: Linux. Version: Ubuntu 64-bit (even if you plan to install a different distro. This just sets default resource recommendations).
Memory: Allocate 8192 MB (8 GB). Every guide on the internet will tell you 4 GB is enough. It's technically enough to boot. It's not enough to run Firefox with 15 tabs open plus SpiderFoot plus a terminal without everything grinding to a halt. If your host machine has 16 GB, give the VM 8. If your host has 32 GB, consider giving the VM 12.
Processors: 4 CPUs. Two will work but you'll feel it during any tool that does concurrent network requests.
Hard Disk: Create a new virtual hard disk. VDI format. Dynamically allocated. Set the size to 50 GB. "But guides say 30 GB." Those guides aren't accounting for snapshots. Every snapshot stores the delta between the current state and the snapshot point. Run three investigations without reverting, and you can eat through 30 GB of snapshot storage on top of the base install. 50 GB gives you room.
Settings to Change Before First Boot
Before you boot the VM for the first time, open its Settings:
Display → Screen: Set Video Memory to 128 MB. The default (16 MB) gives you a tiny resolution with no way to scale it until Guest Additions are installed.
Network → Adapter 1: Should be set to NAT by default. Leave it there. I'll explain why in the network section.
USB: Unless you have the Extension Pack and need USB passthrough, leave the USB controller on USB 1.1 or disable it entirely. Fewer attack surface vectors.
Download the OSINT VM Setup CheatSheet
Choosing Your OS: Pre-Built vs. Roll Your Own
You have two paths here, and which one to pick depends on how much you trust other people's software and how much time you want to spend on setup.
Path 1: Import a Pre-Built OSINT VM
The fastest route. Download an .ova file, go to File → Import Appliance in VirtualBox, select it, adjust RAM and CPU settings, and click Import. Done in 20 minutes depending on your download speed.
The main options:
TraceLabs OSINT VM (version 2025.12, released December 2025). Kali Linux base with OSINT tools pre-installed. About 5-6 GB download. Actively maintained by @404Yeti and @nat-yaml with quarterly release planning. The latest build added Brave Browser and improved script quality through ShellCheck CI. Good for getting started fast or for TraceLabs Search Party CTF events.
CSI Linux. Ubuntu-based, heavier, focused on digital forensics alongside OSINT. Check csilinux.com for the current image size, as it varies by release. If your work blends OSINT with forensic analysis, this saves you from maintaining two VMs.
Tsurugi Linux. Also Ubuntu-based, also heavy. DFIR plus malware analysis plus OSINT. Designed for forensics professionals. If you're purely doing OSINT, Tsurugi has a lot of tools you'll never open.
When you import someone else's .ova, you're trusting their entire build pipeline. You're trusting that every package in that image came from legitimate repositories, that no one tampered with the build between compilation and upload, and that the tools are configured without backdoors. For distributions with public build scripts on GitHub (TraceLabs has this), you can audit the process. For others, it's trust-on-first-use. Verify the SHA256 checksum of the .ova before importing.

Path 2: Build From Ubuntu
More work upfront. More control over what ends up on the machine. This is the approach Bazzell recommends in the IntelTechniques book, and it's what I'd suggest if you plan to use this VM for real case work over months or years.
Download the Ubuntu Desktop ISO from ubuntu.com/download/desktop. The current LTS (Long Term Support) version gets five years of security updates. In VirtualBox, click your VM and hit Start. It'll ask for a startup disk. Point it to the ISO you downloaded. Walk through the Ubuntu installer: language, keyboard, timezone, username, password. Takes about 15 minutes.
Once Ubuntu boots for the first time:
This pulls all security patches released since the ISO was built. Run this before installing anything else.
Then install the tools you need. Not the tools some guide says you need. The tools you use. If you primarily do social media investigations, you don't need Shodan CLI. If you never touch network infrastructure, skip Recon-ng. Start minimal and add as your work requires. A few that cover broad ground:
$ sudo apt install firefox chromium-browser
# Python tools (after installing pip)
$ sudo apt install python3-pip
$ pip3 install socialscan sherlock-project holehe
# Network/infrastructure tools
$ sudo apt install whois dnsutils curl wget
# Metadata analysis
$ sudo apt install exiftool mat2
Every tool you install is a tool you need to update and a tool that can break. Keep the list short.
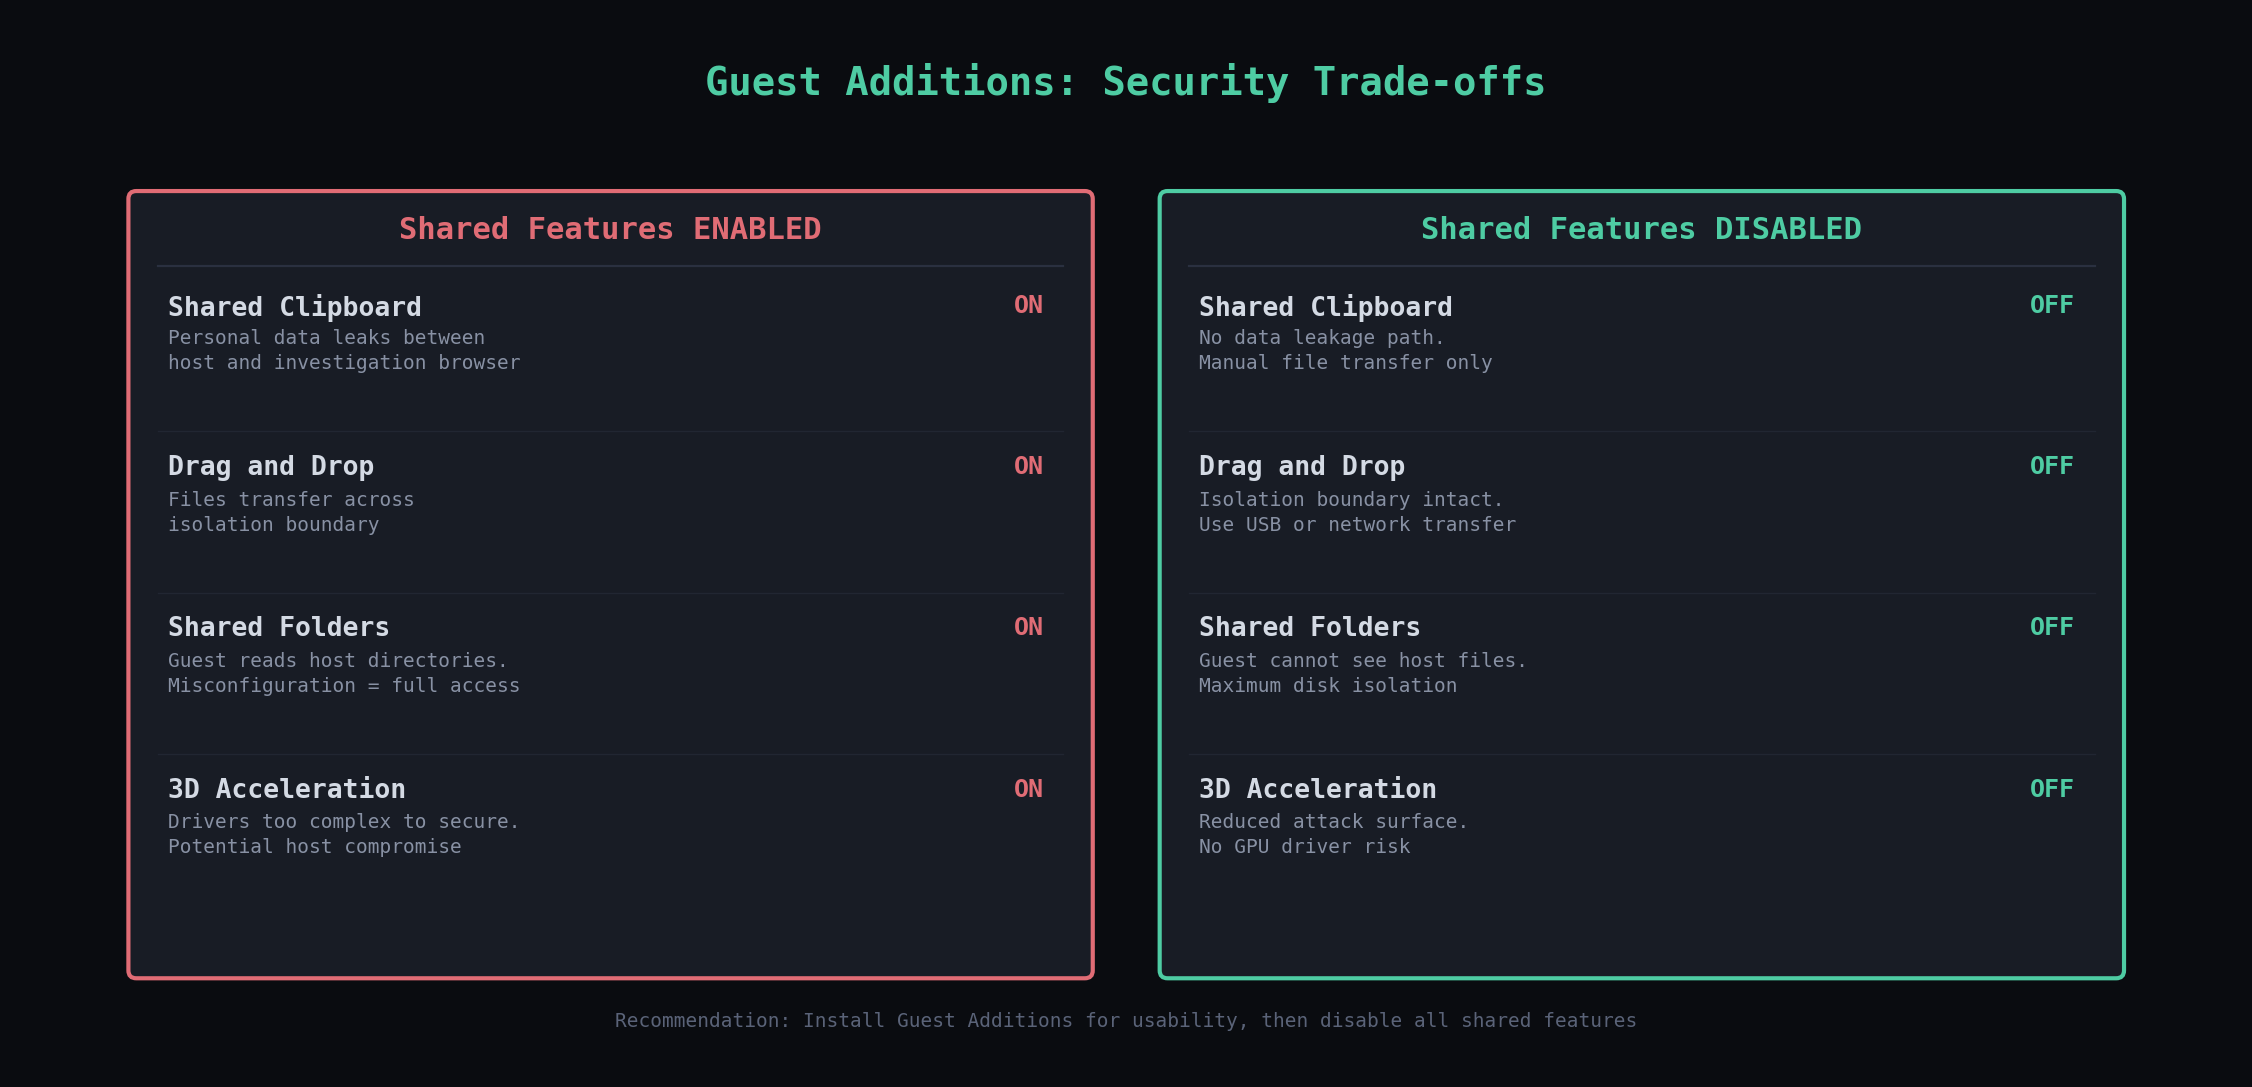
Guest Additions: Install Them, Then Lock Them Down
Guest Additions are VirtualBox's integration layer between your host OS and the guest VM. They give you dynamic screen resolution, mouse pointer integration (so your cursor doesn't get trapped in the VM window), shared clipboard, drag-and-drop file transfer, and shared folders.
Install them. Running a VM at 800x600 with a captured mouse cursor is miserable enough that people abandon the whole setup. In the running VM's menu bar, click Devices → Insert Guest Additions CD image. Then in the guest terminal:
$ sudo mount /dev/cdrom /mnt
$ sudo /mnt/VBoxLinuxAdditions.run
$ sudo reboot
After reboot, your VM window will resize with the VirtualBox window. The usability jump is significant.
Now lock down the features you don't need. I'll include some suggestions below as each one creates a data pathway between your host and guest that weakens isolation but like the other options, it's a tradeoff. Disable the options below unless it doesn't make sense for your context/work.
Shared Clipboard: Devices → Shared Clipboard → Disabled. A clipboard shared between host and guest means an accidental Ctrl+V could paste your personal data into an investigation browser, or copy investigation data to your host clipboard where it could end up in a personal message. Disable it.
Drag and Drop: Devices → Drag and Drop → Disabled. Same logic.
Shared Folders: Machine → Settings → Shared Folders. Remove any entries. Shared folders give the guest direct read (or read-write) access to directories on your host. One misconfigured share and your investigation VM can see your home folder.
3D Acceleration: Settings → Display. Uncheck "Enable 3D Acceleration." The VirtualBox security guide says it plainly: 3D graphics drivers are too complex to be made properly secure. Any software that touches them can potentially compromise the host OS. For an OSINT VM where you're running browsers and terminals, you don't need GPU acceleration.
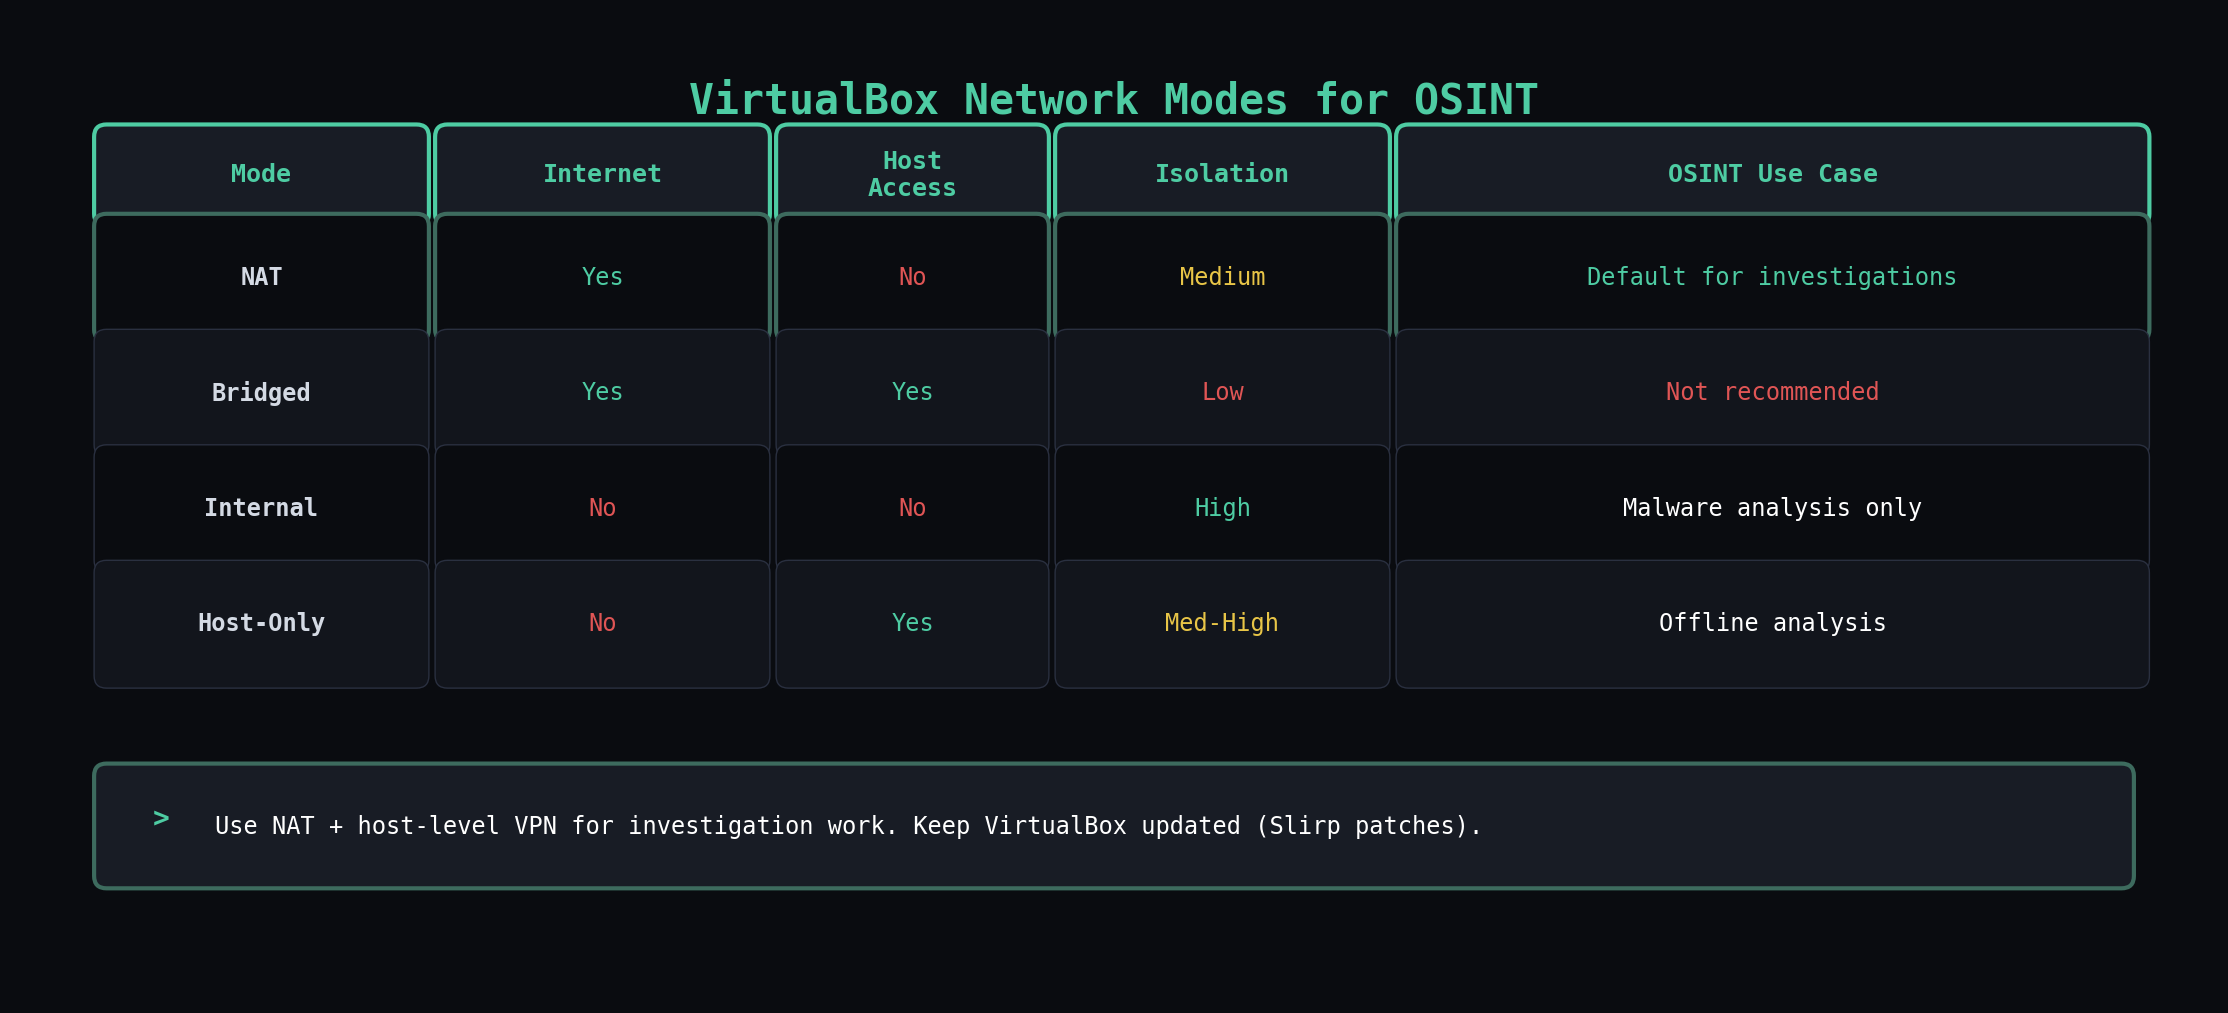
Network Configuration: What NAT Does and Why It Matters
VirtualBox gives you four networking modes. Most guides say "use NAT" and move on. Here's what each one does so you can make the right call for your specific workflow.
NAT places your VM behind a virtual router that VirtualBox manages. The guest gets a private IP (usually 10.0.2.x) and communicates with the internet through the host's network connection. From the perspective of any website you visit from inside the VM, you appear to be your host machine. The VM itself can't be reached from the outside, and other devices on your local network can't see it. For investigation work where you need internet access but don't want the VM directly exposed, NAT is the default choice.
Security caveat: VirtualBox's NAT mode uses a modified Slirp networking stack. Late 2025, researchers demonstrated a reliable VM escape through this stack by exploiting unsafe memory handling in the packet heap allocator. If you're on VirtualBox 7.2.6, this is patched. If you're on anything older, update before using NAT mode for investigation work.
Bridged Adapter puts your VM directly on your physical network as a separate device with its own IP address. Your router sees it, other devices on the network see it, and its traffic is visible at the network level. For OSINT work, this is almost never what you want. Your VM's MAC address and network traffic become visible to anyone monitoring the local network.
Internal Network creates a network that only exists between VMs. No internet access, no host access. Useful if you're analyzing captured malware and want two VMs to communicate without any connection to the outside world. Not useful for OSINT investigation work.
Host-Only Adapter lets the VM talk to the host and vice versa, but gives the VM no internet access. Useful for transferring files between host and guest when you want to do it over the network instead of shared folders. Not useful as your primary OSINT network mode since you need internet access for investigations.
Layering VPN and Tor
Run your VPN on the host machine, not inside the VM. When the VPN runs on the host, all traffic from every application on that machine routes through the VPN tunnel. If you run the VPN inside the VM instead, DNS queries and other traffic can leak through VirtualBox's NAT before the VPN tunnel establishes. Host-level VPN is the safer default.
For investigations that need stronger anonymity, chain VPN and Tor. VPN on the host, Tor Browser inside the VM. The VPN prevents your ISP from seeing that you're using Tor. Tor prevents the destination from seeing your VPN's IP. Neither layer is bulletproof alone, but the combination makes traffic correlation substantially harder.
After setting up your VPN and Tor configuration, verify it works. Inside the VM, open a browser and go to dnsleaktest.com. Run the extended test. If you see your real ISP or geographic location in the results, something is leaking. Fix it before starting any investigation work.

The Snapshot Workflow That Makes All of This Worth It
A snapshot captures the entire state of the VM at a point in time: the disk, the memory, the configuration. When you revert to a snapshot, every change made after that snapshot disappears. Every browser cookie, every downloaded file, every cached credential, every piece of malware you might have accidentally clicked. Gone. The VM returns to the exact state it was in when you took the snapshot.
Here's the workflow:
1. Build your clean base. Install the OS, install your tools, configure your browser profiles, set up your VPN/Tor layering, run all updates. Get the VM into the state you want every investigation to start from.
2. Take the "Clean Base" snapshot. In VirtualBox Manager, select your VM, click the Snapshots tab (the camera icon), and click "Take." Name it "Clean-Base-YYYY-MM-DD". This is your gold master.
3. Before each investigation, revert to Clean Base. Right-click the snapshot, select "Restore." Confirm. Your VM is now identical to the state it was in when you took that snapshot. No artifacts from previous work.
4. Work your investigation. Do whatever you need to do. Browse, download, run tools.
5. When the investigation ends, preserve or destroy. If you need to keep the investigation state for documentation, evidence, or later review, take a named snapshot ("Case-2026-0401-SubjectName") before reverting. If you don't need it, revert straight to Clean Base.
6. Repeat. Every new investigation starts clean.

Maintaining Your Clean Base
Every month or so, revert to it, run full system updates, update your tools, and take a new Clean Base snapshot. Delete the old one. This ensures the latest patches are installed in case new vulnerabilities are discovered.
What to Do When Things Go Wrong
VM won't start, error about VT-x/AMD-V: Hardware virtualization is disabled in your BIOS/UEFI. Reboot into BIOS settings (usually Del or F2 during boot), find "Intel Virtualization Technology" or "AMD-V" or "SVM Mode," enable it, save, and reboot.
VM is unbearably slow: Check how much RAM you allocated. Check if your host is running at capacity (Task Manager on Windows, Activity Monitor on macOS, htop on Linux). Close memory-heavy applications on the host. If your host has less than 16 GB total RAM, you're going to have a rough time with an 8 GB VM.
Screen resolution stuck at low resolution: Guest Additions aren't installed or aren't working. Reinstall them. If they fail to build, you're usually missing kernel headers:
Network not working in the VM: Check that Adapter 1 is enabled in VM settings and set to NAT. Inside the VM, check if the interface is up:
$ sudo dhclient enp0s3
VirtualBox conflicts with Hyper-V on Windows: Open PowerShell as administrator and run:
Reboot. This disables Hyper-V. If you need Hyper-V for WSL2 or Docker, you'll need to choose between them or switch to VMware, which handles coexistence better.
Where to Go From Here
The VM is the foundation, not the finished product. Once you have a clean, isolated, properly networked investigation environment, the next layer is the tools and techniques you run inside it. Browser configuration for sock puppet accounts. Metadata extraction workflows. Search engine pivoting. Each of those deserves its own walkthrough, and they all assume you have a VM that doesn't leak your identity while you're doing the work.
The OSINT VM Setup CheatSheet I mentioned is the companion to this post: VirtualBox settings that matter, network mode trade-offs, layering VPN and Tor safely, snapshot discipline, and a rebuild cadence checklist. Keep it next to your machine while you stand up or audit an investigation VM.
I'm looking for working investigators, not beta testers.
InsightsNexus is a local-first investigation workspace — graph canvas, evidence, notes, transforms, and audit trail in one place. Everything runs on your machine.
I'm running a small early-access program for practitioners who do this work professionally: analysts, journalists, fraud investigators, CTI operators. Real cases, honest feedback, direct line to the builder.